Session Recordings
See What Your Visitors Do on Your Page
What It's All About

The Session Recordings feature enables you to actually see what your visitors are doing on your website. You can view video recordings of visitor's actions during their session, clearly illustrating where clicks occurred, content viewing patterns, and overall actions taken. Analyzing this valuable information empowers you to optimize your website for a better visitor experience.
Set the Date

Right above the tiles, you can see a date picker. This enables you to select a certain time period, or specific day, for which you want the dashboard's data to correspond.
It is crucial to limit the presentation of data to specific dates or time frames during which you executed potential campaigns or implemented other strategies. This will allow you to assess the effectiveness of these actions and use the insights gained for future planning.
Some General Hints

These tips will help you discover hidden information and get the most out of this module to analyze your session recordings:
- Recording Limits & Status: Find your current usage status (the number of active recordings and your recordings limit) in the top left corner of the Session Recordings screen — note that limit is determined by your subscription and does not reset monthly.
- View All Recordings: To ensure you see all active recordings, open the date picker and select the preset option, Install Date → Today.
- Refresh Button: Located in the upper right corner next to the date picker. A single click will refresh the data on the report block without reloading the entire page.
- Hover for Details: Simply hover over various elements to discover the full range of data packed into the interface.
- AI Assistant Button: Meet TWAIA, your new AI assistant! Click the TWAIA icon, located in the top right corner of every module, to get instant, smart insights and boost your platform experience.
- Access Restrictions: Your ability to view or take action may be limited by your contributor role.
- Privacy & Visitor Data: Access to detailed visitor information is governed by your selected data privacy mode. For full details on data collection and privacy settings, please refer to our Privacy Center.
- NEWKeyboard Navigation: We have implemented tab-key navigation to enhance accessibility, allowing you to move through key interface elements sequentially without a mouse. Use the Tab key to cycle forward through interactive elements such as buttons, links, and form fields or hold Shift + Tab to move backward. When the visual focus indicator highlights an element, press Enter or Spacebar to activate it. This update is now available in Session Recordings, General Settings, and the Privacy Center, making these areas more accessible for keyboard users while enhancing usability for everyone. We will continue expanding this support to additional areas over time.
How to Activate Session Recordings

Understand your visitors better by seeing exactly what they do on your site. The Session Recordings feature allows you to watch video replays of your real website visitor sessions, helping you identify user behavior, friction points, and opportunities for conversion rate optimization.
To activate Session Recordings, please follow these steps:
- On the Main Menu, navigate to Visitor Behavior then select Session Recordings.
- You’ll be redirected to the Welcome screen. Click the Let’s Get Started button.
- Set your recording preferences, then click Save Changes. Alternatively, you can select Setup Later from Settings, and configure settings at a different time.
- Once saved, you’ll see the confirmation message “Your changes were saved successfully!” and be taken to Session Recordings Overview.
The Session Recordings feature is now active and will begin collecting new visitor data according to your specified settings.
Important:You can change these settings at any time by just going to Website Settings > Module Settings > Session Recordings.
Session Recordings Overview

The Session Recordings Overview provides a comprehensive view of your visitors' session recordings, offering valuable insights into how they interact with your website. Each row in the table represents a visitor's session recording, encapsulating their interactions and details.
The Session Recordings main table is organized with the following key columns:
- Recording ID & Date: This column shows the session recording's unique ID, which is generated automatically by the platform. You can use these IDs to search in the report block's filters. The date and time indicate when the respective session recording was created.
- Duration (mm:ss): This column displays the duration of each session recording in minutes and seconds.
- Alarming Behavior Events: This column displays the number of Alarming Behavior Events(such as rage clicks, dead clicks, excessive scrolling, etc.) that occurred during each session recording. The total count of ABEs displayed on the dashboard are shown on the column header. Hover over each row to access the tooltip for more details.
- Visited Pages: This column shows the number of different pages visited during the session recording. Additionally, it displays the visitor's entry and exit pages for the session. Hover over each element for more details. Depending on your website's data protection settings, certain information may not be available.
- Visitor Details: This column shows the visitor type for each session recording, with our platform distinguishing between new, returning, and converted visitors. Clicking the location icon redirects you to the Latest Visitors Map where it shows the visitor’s approximate location.
- Referrer: This column displays the referrer URL through which the visitor reached your website, triggering the session recording.
- Recording Details: This column provides details about the device type, operating system, and browser used during the recorded session.
- Actions: This column lists all available actions for each session recording within the report block. It features two options:
- View Session Recording Icon: Directs you to the actual video of the session recording.
- More Options button: Offers additional recording actions, including Mark as Favorite, Add a note, Mark as Watched, Copy Recording's Link, and Delete Recording. You can read more information here.
Important Notes:
- The top right corner of the table offers several tools to help you navigate the data efficiently. You can filter the results, adjust the number of entries per page, and easily move between pages.
- For the feature to become accessible, it is essential to correctly install the tracking code, enabling the recording of visitor sessions.
- To control the recording of new visitor sessions, simply toggle the 'Active' button in the upper right corner of this view (situated adjacent to the reload icon). This allows you to pause or reactivate recording at any time.
- Accessibility to visitor data is determined by your current Data Privacy Mode setting. For a complete understanding of these modes, we recommend reviewing our Privacy Center here.
Identifying ABEs on Session Recordings Overview

To better understand visitor behavior, hover over any row under the Alarming Behavior Events column to view detailed information about the specific alarming behavior events (ABEs) that occurred during that session.
The column header displays the total count of ABEs, while the row-level details provide a breakdown of different types of alarming behavior events and their count.
Session Recordings - Card View

Alternatively, you can switch the view by tapping the Menu Icon on the top left of this report block, and then selecting "Card View" from the drop-down list. Instead of the default which is the table view discussed in the Session Recordings Overview, you will now see the session recordings individually displayed on each card.
You'll discover the same information here, but opting for this is the best choice if you want to concentrate on the metrics of each conversion funnel.
Each card shows the Recording ID and the Date & Time of Recording. Below it, you'll find the Recording Duration, Visited Pages, and Visitor Type. The last row displays the Recording Details, Referrer, and the Play button.
Hover over "Visited Pages" to view the History of Visitor's Visited Pages.
At the top right of each card, you’ll find the “Actions” button for more options to manage your session recordings.
Managing your Session Recordings

The sections we have just seen are mainly for information purposes with the exception of the Actions column. As the name would suggest, this is a section where you can manage your session recordings and tailor things a little more.
You can find the Actions column on the rightmost part of this view and below are the following options available for you:
- Mark as Favorite: If you click here, a star will be added to the Recording ID & Date column so you can easily see the recordings you wish to go back to.
- Add a Note: If there is something you have found particularly insightful in this recording and want to take note of, you can do so here. Clicking on this option will open a separate text bubble on the screen for you to add a note to that recording.
- Mark as Watched: Watching many recordings (and not necessarily in order) can get confusing - so if you have finished watching one and done all you need to for now, just click here and select "Mark as Watched". If at some point, you want to add it to a list to go back and view it again, simply select the Actions tab and select "Mark as Unwatched".
- Copy Recording's Link: If you need to share a recording with a colleague or perhaps put together a document with a selection of your Visitor Recordings, simply click on the Copy Recording's Link button and the link will automatically be copied to your clipboard.
- Delete Recording: In the event that you wish to delete a Visitor Recording, you are able to do so by clicking Delete Recording. As a safety measure, a box will open to ask if you are sure you want to delete it. This cannot be undone. Note that this action can only be performed by a user with admin or owner access permissions.
Important Note: Some actions may be limited based on your role and website permissions. Please check with your website admin if you are unable to select an option.
Bulk Actions for Session Recordings

The Bulk Action feature in the Session Recordings Overview lets you manage multiple session recordings simultaneously.
To begin managing your recordings in batches, first click the Select button and choose your scope:
- All: Selects all existing session recordings in the table, regardless of whether they are currently displayed visually or not.
- All items on page: Selects only the recordings currently displayed on the table.
Once your sessions are selected, click Select an Action to manage them using the options below:
- Mark as Favorite: By clicking here, the recording will be marked as a favorite, and you'll notice an orange star icon displayed next to the Recording ID.
- Unmark as Favorite: You can remove a session recording from your Favorites by selecting this option.
- Mark as Watched: Navigating through multiple recordings, especially without a specific order, can get confusing. Once you've finished viewing a recording and taken all necessary steps, click here and select Mark as Watched.
- Mark as Unwatched: If you want to revisit a recording that has been watched, you can choose Mark as Unwatched.
- Delete Recording(s): To delete a recording, simply click Delete Recording(s). A confirmation box will pop up to ensure you're sure about the deletion because this action can't be undone. Please note that only contributors with owner or admin access can perform this action.
Filters for Session Recordings

The Session Recordings Overview allows various filter options that mostly refer to attributes of the visitor or the session recording itself. It streamlines your search by letting you select and display only the data that matches what you're looking for, making it easier to find exactly what you need.
The Traffic Channel filters now include the AI Traffic filter. This update allows you to isolate and track session recordings from major generative platforms (such as ChatGPT, Google Gemini, and Perplexity). This gives you precise data on the impact of these new AI referral sources on your site's engagement.
| Filter Category | What It Filters and Why |
| Alarming Behavior Event | Filters the recordings that contain any Alarming Behavior Events (e.g., dead clicks, rage clicks) to isolate sessions that can hint towards bad UX, technical bugs or lost conversions/revenue. |
| Browser Name | Filter the data by browser name (e.g., Chrome, Safari) to pinpoint and debug technical errors that only occur in certain browser environments. |
| Contains Page | Filters the recordings where the URL includes a specific text string (e.g., /en, /product-x) to focus your analysis exclusively on visitors who interacted with a specific section or page. |
| Countries | Filters the recordings by the visitor's country of origin. which is essential for identifying local issues, regional performance trends, or market-specific UX needs. |
| Devices | Filters the session recordings by device type (Desktop, Tablet, or Phone) to test mobile responsiveness and find layout bugs specific to a device type. |
| Does Not Contain Page | Filter session recordings for URLs that do not contain certain URL elements (i.e. "/product-x") |
| Duration | Look for visitor session recordings that have a certain range of duration (Minimum Duration (Seconds) or Maximum Duration (Seconds)) to quickly compare the behavior of highly engaged versus quickly abandoned visitors. |
| Entry Page | This filter segments sessions by the first page the visitor viewed upon arrival to evaluate the effectiveness of specific landing pages. |
| Exit Page | This filter segments sessions by the last page viewed before the visitor left the site to pinpoint the exact pages causing high drop-off. |
| Funnel Filter | This filter isolates recordings where the visitor failed to proceed through a defined conversion path, showing the critical moment visitors quit a key goal. |
| Has a Note | Find recordings with notes attached quickly by using this filter. |
| Marked as Favorite | Filter your recordings to see just the ones you've marked as favorites. |
| Operating System | Filter session recordings by operating system to help isolate system-specific bugs that may be affecting a subset of your visitors. |
| Page Count | Search for visitor session recordings that have a certain range of pages visited during the session. |
| Recording ID | Filter the session recordings using the Recording ID. |
| Referrer URL | Filter the list by the Referrer URL to evaluate the quality of traffic and visitor intent from specific sources. |
| Traffic Channel | Filter the session recordings by traffic channels, such as Direct Visit, Email, Paid Ads, and AI Traffic. |
| UTM Campaign Name | Filter the list by campaign name. |
| Visitor Type | Filter the recordings by visitor type (New, Returning or Converting Visitor). |
| Watched | Search for all session recordings you already watched. |
How to Filter Data
- Apply a Filter: Click the filter icon, choose your filter, specify criteria, and click Submit.
- Save a Template: Click Save set filters for report block, name the template, and click Save Changes.
- Use a Template: Click the filter icon, go to the Report’s Saved Filters tab, select the template, and click Submit.
- Manage Templates: Click the pencil icon next to the template to rename it or select Delete Template (confirmation required).
eCommerce Events Filters (Wix only)

We have fully integrated with Wix engagement and eCommerce events across both of our applications for Wix users. This means we are ingesting all those listed events triggered by visitors on Wix websites.
This integration allows Wix users to easily filter their session recordings overview for crucial events like 'Purchase,' 'Registered,' 'Booked a table,' 'Login,' and 'Abandoned Cart.'
To facilitate this, we have introduced a new first-level filter set called 'eCommerce Events', which includes second-level filterable events. Users can select multiple eCommerce events filters simultaneously to view only the recordings that contain those specified events.
Important Note: Access to the 'eCommerce Events' filters is available only for Wix users and requires a paid plan.
Users who are not on a paid plan will see the premium filter set fixed at the top (first-level) with a 'Premium' badge on both first and second levels. The 'Upgrade to Unlock' button will also appear at the top of the second-level filter set. Note that the ‘Upgrade to Unlock’ button will be visible at the top of the second-level filter set. Clicking on any second-level filter or the 'Upgrade to Unlock' button will trigger the upgrade modal, which features a 'Get Filter Access' button leading to the upgrade process.
If the user is on a paid plan, the filters are readily available, will be ordered alphabetically, and no premium badge will be displayed.
The filters correspond to the following Wix eCommerce Events:
| eCommerce Events | Description / Trigger Condition |
| Add To Cart | Triggered when a visitor clicks on the Add to cart button. |
| Add Product Impression | Triggered whenever a page is loaded that contains either a product gallery or widget. |
| Product Page Loaded | Triggered when a product page loads. |
| Start Payment | Triggered when the visitor gets to the payment part of the checkout funnel. |
| Delivery Method | Triggered when the visitor adds personal information and clicks to advance to the next step in the checkout flow. |
| Shipping Details | Triggered when the visitor adds shipping details and clicks to advance to the next step in the checkout flow. |
| Agree To Terms | Triggered when the visitor check the Agree to terms & conditions’ checkbox. |
| Pickup Details | Triggered whenthe visitor enters pickup information and clicks to advance to the next step in the checkout flow. |
| Click Product | Triggered when the visitor clicks on a product from any of the galleries. |
| Remove From Cart | Triggered when the visitor clicks to remove an item from the cart. |
| Initiate Checkout | Triggered when the Buy Now button is clicked. |
| Add Payment Info | Triggered after the visitor adds their payment information. |
| Purchase | Triggered on thank-you-page load. |
| View Content | Triggered when a visitor views the product page. |
| Customize Product | Triggered when a visitor changes something on the product page, such as choosing the product size or color. |
Detail Page
The next part of this submodule is the Detail Page View. After getting acquainted with the functionalities of each button, let's now explore the highlight of it all – the recording view!
The majority of the screen is dedicated to showcasing the Session Recording, offering a detailed perspective. Now, let's uncover the remaining features on this page. Within this section, you have the option to choose between two views, Recording Details and Visitor's Actions. Keep reading to discover more about these views!
Recording Details

Within the Recording Details view, you can find all the essential information organized in one place for every recording. This includes details such as the Referrer, Visitor Type and the session's Country.
This view includes the following information and actions:
- Recording ID: The recording ID serves as a unique identifier for a recording and is anonymized.
- Copy Recording's Sharing Link to Clipboard: You can now easily share the link to a recording by clicking this button next to the recording ID in the header.
- Mark Session Recording as Favorite:You can add any recording to your favorites by simply clicking this button, either in the detailed view of the recording or in the overview table.
- Previous Recording & Next Recording:Seamlessly navigate between recordings using these buttons without the need to go back to the dashboard.
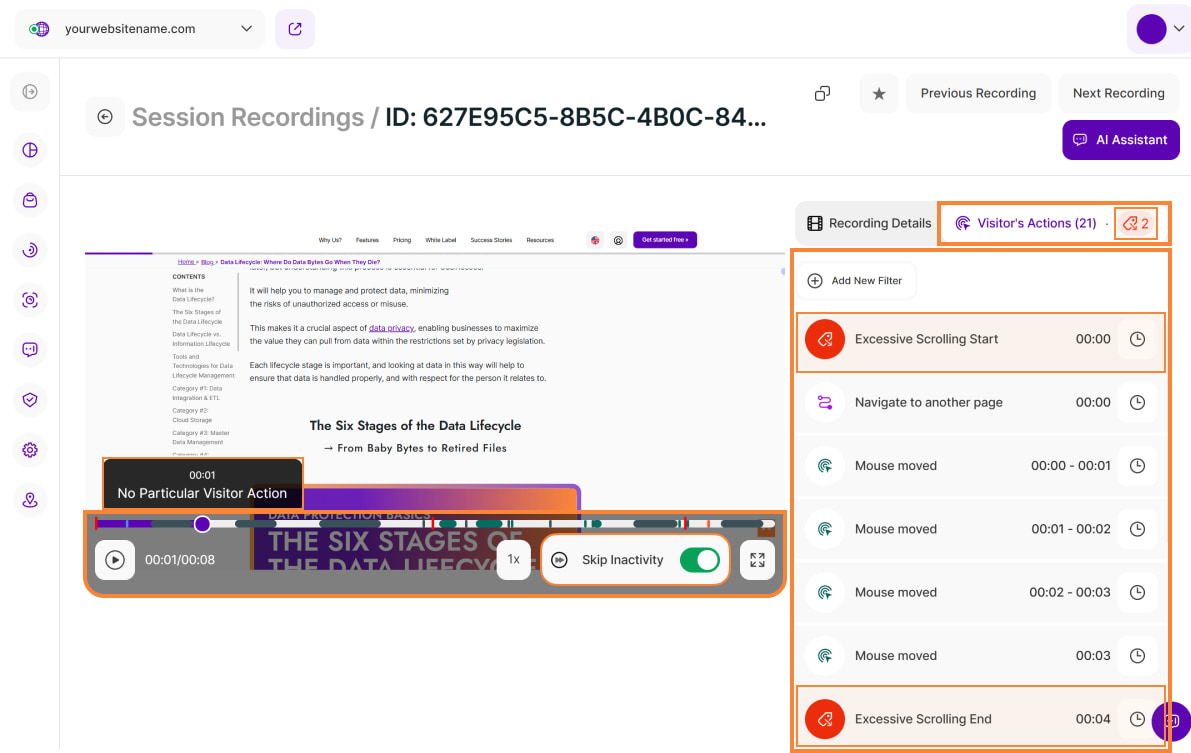
Video Control Bar: Located directly beneath the video, this bar remains visible throughout playback. Use it to manage your viewing experience with the following features:
- Time Bar (Timeline):The timeline provides a visual representation of the visitor's journey and is divided based on the different webpages visited during the session. A white separator marks the beginning of each new page visit within the recording, allowing you to quickly navigate between different stages of the session. Hovering over the time bar displays a tooltip containing the specific timestamp, the detected event, the page label (e.g., Page 1), and the page URL, even if the recording contains only one page. For more specific information on interacting with these tooltips, please see the Timestamp Tooltip Details below.
- Play button: Allows you to 'play' and 'pause' the video.
- Time Counter: Shows both your current position in the video and the total length of the video.
- Speed Controls: Use individual buttons to instantly adjust your playback. Increase the video speed up to 8× with a single click.
- Skip Inactivity button: Allows you to skip parts of the session recordings where the visitor was inactive. Activation applies to the currently selected session recording and all others until you deactivate the function again. The setting is activated immediately and starts skipping right away.
- Full-Screen button: Allows you to maximize or minimize the screen.
Session Recording Details: Displays the basic information of each session recording:
- Creation: Shows the date and time of the recording.
- Visitor Type: Displays the type of visitor (new, returning, or converting).
- Country: Shows the visitor's country of origin. Clicking the location icon redirects you to the Latest Visitors Map where it shows the visitor's approximate location.
- Device: Displays the type of device the visitor used (mobile, tablet, desktop).
- Screen Resolution: Shows the screen resolution of the device used by the visitor.
- Operating System: Displays the operating system the visitor used.
- Browser: Shows the type of browser used.
- Referrer: Shows the referrer or source of traffic.
- Entry Page:The page where a visitor begins their journey, marking the start of a session. Click the Open Website in New Tab icon to view that page directly in a new browser tab.
- Exit Page:This is the last page a visitor views on your website before leaving the site entirely or closing their browser. The Open Website in New Tab icon provides a quick way to view the page URL in a new tab.
- Recording Link: Displays the link of the recording that you can copy using the Copy to Clipboard icon and share with your colleagues.
- Recording User ID:This is another unique identifier but this one is unique to the visitor rather than the recording. You can easily copy it using the Copy to Clipboard icon next to it.
- Add a Note (Optional): Similar to the option of placing a note in the overview of meeting records, you can also do this here.
Note: Keep in mind that the use of this feature depends on your role permissions. - Delete Recording: Deleting a recording is also available from within this view, but please remember, if you choose to delete the recording, this cannot be undone. And, as with other functions, you will need the relevant website permissions to proceed.
The AI Assistant button is located on the far right. For easy access, this assistant feature is positioned directly below the navigation controls.
Important Notes:
- Access Levels:Some functions can only be accessed by a contributor with Admin or Owner access.
Timestamp Tooltip Details:
- If no specific event is occurring at the selected time, the tooltip will display the label No Particular Visitor Action.
- When hovering over the page URL on the time bar, the More Actions (three vertical dots) icon will appear. Clicking this icon opens the URL context action menu for further options.
- When Maximum Privacy Mode is active, the page URL is hidden. Instead, the tooltip will display the default label: URL inaccessible due to website's selected data privacy mode.
Visitor's Actions

Depending on the insights you seek from a session recording, you may find this absolutely essential.
With Visitor's Actions, you can observe every single interaction made by the visitor, whether it's scrolling, mouse clicks, or even eCommerce events triggered by website visitors. This proves incredibly useful, especially when you're on a mission to identify a bug on your site and need to grasp precisely where the issue lies.
The Visitor’s Actions tab header serves as a visual indicator of potential issues within the recorded session. It first displays the number of Normal Behavior Events (NBEs) and highlights the count of Alarming Behavior Events (ABEs) in red.
For a detailed breakdown, simply hover over the tab to reveal the Normal Behavior Events tooltip. Below the title, the message "Actions include X problematic events" is displayed, indicating the total count of Alarming Behavior Events (ABEs) detected within the recording.
The Normal & Alarming Behavior Events table is located below this message. It lists the ABEs first, followed by the Normal Behavior Events (NBEs) and the total number of occurrences for every event.
The Session Recording screen remains on the left. The only difference is that the screen opening on the right displays all the movements or actions that constitute the visit, second by second. This allows you to pause the video when needed, enabling you to pinpoint the exact visitor action corresponding to your investigation.
In this section of the module, you'll find a comprehensive display of all the actions, complete with timestamps and the Jump to Action in Recording button, symbolized by a clock icon. The URL for each action is also displayed below it, depending on the privacy settings.
This tool simplifies the process of moving through the recording, enabling you to effortlessly locate and review the key moments.
A Deep Dive into Visitor’s Actions
The Visitor’s Actions tab provides a comprehensive breakdown of visitor interactions on your website. By analyzing how visitors interact with your website, you can spot potential issues and make changes to improve their experience.
The actions tracked in our platform are divided into two main categories:
NBEs (Normal Behavior Events): These are common and expected visitor actions on a website that generally indicate positive visitor engagement and satisfaction.
| Normal Behavior Event | Technical Definition of Event |
|---|---|
| Blur | The event that occurs when an element, such as an input field or interactive component, loses focus—typically after a visitor moves their focus away from it by clicking elsewhere or using keyboard navigation. |
| Click | A single hit and release of a mouse cursor on an element. |
| Context Menu | Opening the right-click context menu on a webpage within the browser. |
| Double Click | Two consecutive clicks on an element within a short time frame. |
| Focus | The event that occurs when an element, such as an input field or interactive component, becomes active and ready to receive visitor input, typically through clicking on it or navigating to it via keyboard (example: Click in an input field, which is then "focused"). |
| Input Field Change | An event triggered when the value of an input field is modified by the visitor, such as typing, deleting, or pasting text. |
| Navigate to {url} / Navigate to another page | When a visitor moves from the current page to a different one. |
| Mouse (Click) Down | The event that occurs when a mouse button is pressed down on an element, initiating interaction but not yet completing it until the button is released (eventually triggering a “mouse (click) up” event). |
| Mouse Moved | Movement of the mouse cursor over the page or element. |
| Mouse (Click) Up | The event that occurs when a previously pressed mouse button is released, often signaling the completion of an interaction that began with a “mouse down” event. |
| Scrolling | Vertical movement of the webpage content. |
| Touch End | The end of a touch event (finger lifted from the screen). Only triggered on touch devices. |
| Touch Move | Movement of a finger across the screen during a touch event. Only triggered on touch devices. |
| Touch Start | The start of a touch event (finger placed on the screen). Only triggered on touch devices. |
| Viewport Resize | The browser window’s visible area size is changed. |
ABEs (Alarming Behavior Events): These are specific types of scrolling or clicking behaviors that imply alarming visitor experience and hence need action on the website owner’s behalf.
| Alarming Behavior Event | Technical Defintion of Event | Use Case Suggestions | Action Item Suggestions |
|---|---|---|---|
| Excessive Scrolling | Scrolling a distance in pixels bigger than 3 * screenHeight within 3 seconds |
|
|
| Dead Clicks | A click that doesn't trigger a visual change, download action, opening a new tab or a URL change within 1s |
|
|
| Intense Mouse Movement | Moving the mouse a distance in pixels bigger than 2 * screenWidth within 3 seconds |
|
|
| Rage Clicking | 5 or more clicks within 6 seconds that:
|
|
|
| Rapid Page Reloading | Refreshing a page/URL 3 times within 7 seconds |
|
|
| U-Turns | A change from URL A to URL B and then back to URL A within 7 seconds |
|
|
Important Notes:
- The alarming event will last as long as the alarming behavior continues. So if 5 clicks occur within one second, the alarming behavior event lasts only 1 second. However, if the user continues the click sequence mentioned above, the alarming behavior event only ends when the alarming behavior itself stops.
- ABEs that have both a start and end action, like ‘Excessive Scrolling Start’ and ‘Excessive Scrolling End’ are combined into one event in the overall events count. They are only shown as two events if there is an important event shown in between.
- Consecutive ABEs of the same type happening multiple times in a short period of time (1 second) are grouped into one event to improve visibility.
For ABE categories “Rapid Page Reloads” and “U-turns” we are even going a step further. Those will each be grouped by type and counted as a single event if they happen multiple times within 30 seconds.
Instead of counting each event occurrence individually (plainly following its definition), the system will aggregate multiple actions within a specific time window and treat them as one event. This significantly improves clarity without risiking important insights.
- Example for ABE “Rapid Page Reload”: a visitor session triggers this ABE by fulfilling its criteria to reload “URL X" 3x within 7 seconds – but instead of reloading it only 3x in 7 seconds (plainly fulfilling the ABE's definition), the visitor reloads “URL X” 8 times within 30 seconds. In order to improve clarity we decided to not count multiple ABEs for this occurrence, but summarize it in just alarming behavior event. Of course, this can't go on forever. If the visitor continues to reload the same URL for more than 30 seconds, another ABE “Rapid Page Reload” will be counted. And so on.
- ABE “U-Turns”: the same concept applies to this ABE type. A visitor session navigating between "URL X", "URL Y", "URL X", "URL Y" within 30 seconds will only be summarized as a single event trigger rather than two.
As long as actions fitting an ABE's definition occur sequentially within the stated time frame actions, the event will be counted as a single event.
- Move the mouse pointer over a visitor action event (NBE or ABE) to display the help text with the definition of the respective event.
- Hover over the time bar to view a respective timestamp and its detected event. If there is no event, the timestamp and text 'No Particular Visitor Action' will be displayed.
Filters for Visitor's Actions

Take your visitor analysis to the next level with our powerful filtering feature. You can now easily focus on specific actions or events to gain a deeper understanding of your visitors’ behavior.
Following the integration of Wix eCommerce events, the eCommerce events filters (for Wix websites only) are now available in the Visitor’s Actions tab, alongside Visitor Actions.
To apply a filter, simply click Add New Filter, select one or multiple event categories you want to focus on, then click Submit.
After filtering, you can click the Jump to Action in Recording button (clock icon) next to any event to instantly jump to it in the recording’s timeline.
Session Recordings Settings

There are various options available allowing you to define in more detail which sessions you would like to record (e.g. page targeting, minimum duration, or visitor activity).
To reach the module settings, click the More Options button located within the tab's title Session Recordings, and then select Recording Settings.
For more details see this support article: Session Recordings Settings.


